Saturday, 15 March 2014

Easy Homemade Iced Coffee

Earlier this week I had iced coffee for the first time. I don't know why I'd waited so long to try it, I love coffee and a friend of mine always gets it and says how much she loves it. I can just tell that's its going to become a new obsession and I can't wait until the summer when I need a caffeine kick but don't want to drink hot coffee.
 
As much as I enjoyed my Iced Latte from Costa, I couldn't help but think that there must be an easy way of making it at home. After a little research I gave making it myself a go using instant coffee, milk, water and sugar and it turned out pretty well.


Here's my recipe for easy homemade iced coffee:
 
To make 1 large glass
2 level teaspoons of instant coffee granules
1/2 teaspoon of sugar
1/4 cup or 60ml of warm water (hotter than lukewarm but not hot)
1 cup or 250ml of milk (I used semi-skimmed)
Ice
Extra milk if required
 
Take a clean jar with a secure lid or a cocktail shaker, flask etc. (anything that has a secure lid and can be shaken easily) and put all the ingredients in, secure the lid and shake well until it is very frothy. Pour into a large glass half filled with ice and you're done!
 
If you prefer your coffee sweeter (I only ever have about a quarter of a teaspoon in hot coffee - if any) add more sugar until it suits you, and likewise if you want more milk, pour in as much as you need after you've poured the frothy coffee into the glass.
 
I couldn't believe how easy and how well this turned out and I'm so glad I won't have to spend a couple of pounds every time I want some iced coffee in the future!
 
 I'd love to hear if you've managed to make it successfully and if you have any variations I should know about! 
 

Thursday, 13 March 2014

Friday Afternoon Treat

I love Fridays. Not just because its the end of the week and the weekend is about to begin but because Friday is when my Graze box is delivered.


Graze is a company that delivers weekly healthy snack boxes. I signed up last November to receive weekly nibble boxes and I haven't regretted it one bit. 
 
On their website you can go through their selection of snacks and decide whether there are any that you never want to receive, or if there are any you want to receive soon. Once you've had the snacks you can let them know whether you liked it, loved it or didn't like it (so you won't be sent it again). Items you've liked or loved will be sent regularly in your boxes.
 
Each box is £3.89 which I think is pretty good value considering you get 4 high quality, tasty snacks sent right to your door. You can cancel at any time and if you're going on holiday you an put your deliveries on hold until you're back. Its really convenient.
 
Last Friday I received my favourite ever nibble box so I thought I'd let you know all about what was in my box and if you're considering signing up this post might convince you to give it a go!

So the inside of the box looks like this...
 

It comes with a handy little leaflet letting you know all the nutritional information and use by dates etc. for the items in each box.

The first snack was called My Thai.


I'd had this in my first ever box and I had 'liked' it on the Graze website so it has been sent to me occasionally. It's described as baked soy bites with a sweet chilli sauce. I don't really know how to describe the baked soy bites, they're sort of crunchy with a slight soy flavour, but anyway they're pretty good. The sauce is fairly hot but its really flavoursome and overall its a really yummy snack. If you're not good with spicy food I would be wary trying this but luckily for me I like spicy food so its not a problem. Plus its only 84 calories which makes it even better!

Next up is Slightly Sweet Healthy Popping Corn.


It comes in a bag to microwave and has the cooking instructions on. Its a good sized portion for one and was a perfect film snack when I was watching Titanic last Friday night (yes, I did spend Friday night watching Titanic - such a thrilling evening). Its only slightly sweet, but for me its sweet enough and the popcorn is really tasty, especially when its eaten warm straight out of the microwave. I didn't take a picture of the popcorn after I'd cooked it (I was too engrossed in Titanic) but it looks like your bog standard popcorn! The popcorn is 116 calories which I think is pretty good for quite a large portion of a snack that's usually a bit naughty.

The other two snacks in my nibble box were ones I hadn't tried before. This one was called Scrumptious Blueberry Swirl...


I'm a bit obsessed with blueberries at the moment so I really enjoyed this. It was raisins covered in blueberry yoghurt, with raspberry infused  dried cranberries and dried blackcurrants. The raspberry cranberries were really good and tasted like little sweets but the blackcurrants were quite hard and I'm not sure I liked the texture - their flavour was nice though. The yoghurt covered raisins made up for the blackcurrants though. They were really yummy and the yoghurt was really good - it inspired me to mix some frozen blueberries with some natural yoghurt which turned out to be a delicious Tuesday night snack.

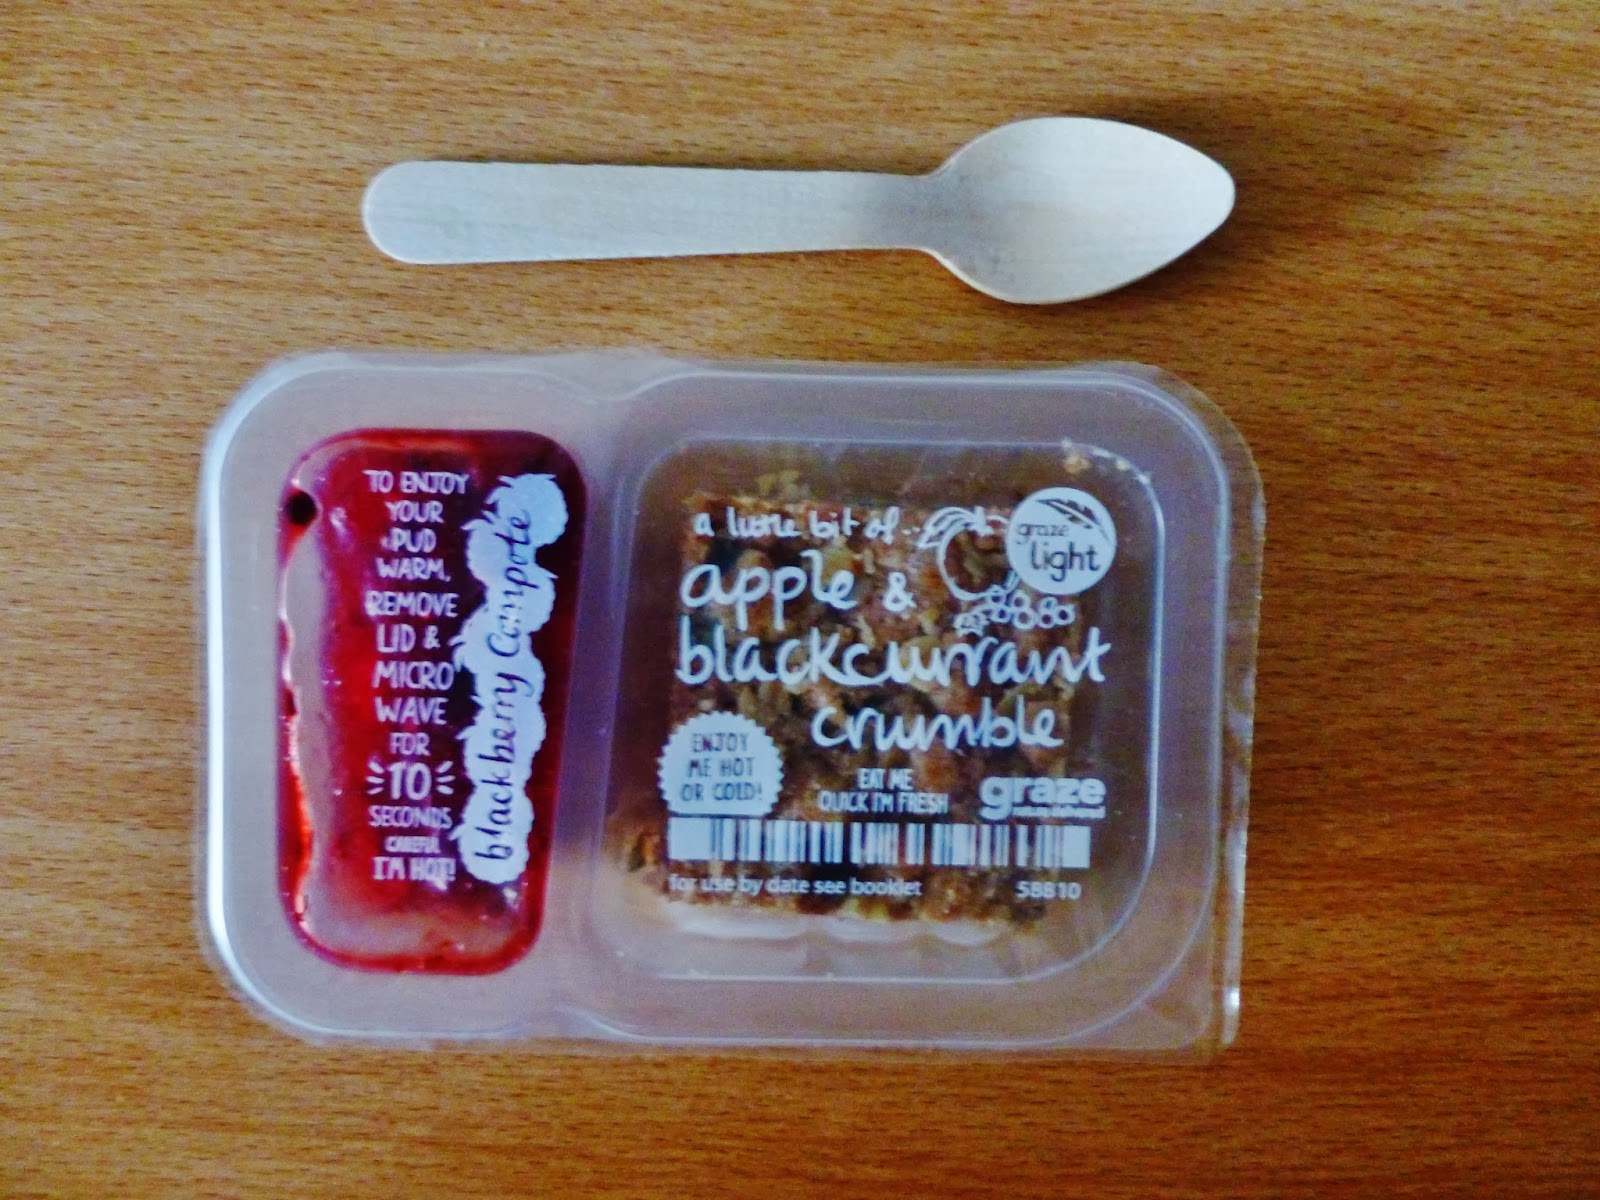
However, the crowning glory of this week's nibble box was one of Graze's 'little puds' - Apple and Blackcurrant Crumble.


It came with a cute little spoon and can be eaten hot or cold - to heat you simply have to remove the film and microwave on high for 10 seconds.

I think this is possibly one of my favourite things I've ever had from Graze, it just tasted so good. Its a pretty small portion but its enough and the high quality taste certainly makes up for a lack of quantity.


It comes with a yummy blackberry compote which I spooned on top of the crumble.
 

There were lots of seeds and oats in it which was a healthy twist on a usual crumble. I don't really know how else to say how much I enjoyed this little crumble - I think you had better just try it for yourself!

I really love getting my Graze boxes and if you like the look of anything I've got then have a look at their website (click here) and have a little look at all their other snacks. If you're still interested give it a go and sign up - you can cancel if you change your mind but I'm sure you'll enjoy getting 4 tasty snacks delivered to your door once a week as much as I do!

Happy snacking!

Friday, 7 March 2014

Chicken, Bacon and Mushroom Risotto

Risotto is one of my favourite things to cook myself for dinner. Its easy, cheap, tasty, filling, comforting - the list of reasons why I love risotto can go on and on.


This is my basic recipe and it can be easily changed if you want to swap ingredients or make more portions etc.
 
To make 1 portion you will need:
 
150g of Arborio risotto rice
3/4 white or chestnut mushrooms depending on how big/small they are
100g of chicken breast, diced
75g of bacon, diced
1 litre of chicken stock
A splash of double cream (optional)
1/2 teaspoon of ground black pepper
1 teaspoon of dried mixed herbs
 
Begin by preparing the chicken stock. Dissolve a chicken stock cube in about 1 litre of boiling water. You probably won't need all that stock but its best to make it just in case and plus I think the flavour of the risotto is better if the stock isn't too strong.
 
Heat a good glug of olive oil in a medium sized frying pan. Dice the mushrooms and add to the pan and stir so they absorb the oil. It might look like there a lot of mushrooms but they shrink quite a lot during cooking. Add the bacon to the pan and stir, making sure nothing sticks to the bottom. You shouldn't need any more oil but if it starts to stick add a touch more. Leave to cook until the mushrooms and bacon is cooked and then add the chicken. When the chicken is cooked through, add the rice to the pan and stir.
 
I'm afraid its fairly boring from here. Add a splash of stock and stir until its nearly absorbed and repeat. It takes about 20 minutes of adding stock and stirring but the end result is definitely worth it! Its important to add the stock slowly because the rice absorbs the liquid slowly and if the rice is cooked but there is still a lot of liquid in the pan to be absorbed, the rice with over cook and it basically won't taste nice. Before its fully cooked, stir in the pepper and herbs, and if you want to add more then go for it! Keep tasting while cooking to avoid adding too much stock - the rice will be nice and soft when its done.
 
Once cooked, I added a splash of double cream because I had some in the fridge that needed using up and I'm glad I did! It was even creamier than usual and that is not a bad thing in my opinion.


As I've said above, I love risotto. Its just so yummy and there are so many ways to alter it. I guess main thing to take from my recipe is the method - fry the additional ingredients, add the rice and stir in the stock slowly.
 
Many people (strangely) don't like mushrooms and one of my friends (very strangely) doesn't like bacon so if you don't want to include them then red onion or peas can be a good substitute for mushrooms and sometimes I like to add a spoonful of sundried tomato paste or parmesan once the rice has cooked for extra flavour.
 
Either way risotto is one of my favourite meals to have after a long day of studying and I hope you find my basic recipe useful!

Wednesday, 5 March 2014

White Chocolate and Raspberry Cheesecake Pots

I'm having a bit of a love affair with white chocolate at the moment and on the weekend I created this recipe to serve at my Brum Dine With Me dinner party. Brum Dine With Me is a society at my university where members are organised into groups and each week we takes it in turns to host dinner parties. Its a lot of fun and a great way to meet other people who love food and cooking as much as I do!
 
Sadly I've given chocolate up for lent so won't be able to make these again until after Easter but I thought I'd share my recipe for anyone who isn't silly enough to give chocolate up for 6 weeks!


To serve 6 you will need:
 
6 deep ramekins or small bowls
 
For the biscuit base
100 g of digestive biscuits
25g of butter, melted
 
For the cheesecake mixture
600g of soft cheese (I used full fat but I'm sure lighter options will work well too!)
300g of white chocolate
30g of caster sugar (roughly)
275ml of double cream
 
For the raspberry sauce
150g of raspberries (I used frozen raspberries which are cheaper than fresh and taste just as good)
100ml of cold water
About two teaspoons of caster sugar
 
Start by crushing up the biscuits into crumbs. It doesn't make much difference whether the crumbs are fine or a bit chunky so go with your personal preference. Combine with the melted butter so all the biscuit is covered and sticks together. Using about two-thirds of the biscuit mixture, press a spoonful of biscuit into the bottom of each of the ramekins or bowls and put in the fridge to set.
 
Very slowly melt the white chocolate in a bowl over gently simmering water. Its important not to rush this along as white chocolate has a tendency to go lumpy and grainy so stir frequently to ensure it melts smoothly. Set aside to cool slightly.
 
In a large bowl, beat the soft cheese until smooth. Stir in the sugar slowly until it is only just slightly sweet (the white chocolate will also make it sweeter so you don't want to add too much sugar at this point). Pour in the cream and use a whisk to beat the mixture until it is thick and drops very slowly from the whisk when lifted. Beat in the cooled white chocolate until it is completely combined (it may start to look a bit lumpy or like a mixture that's curdled so keep going until its nice and smooth). If its a bit too stiff add a bit more cream and if you think it needs to be a bit sweeter add more sugar until it suits your taste. Using a dessert spoon, place a dollop of the cheesecake mixture in the ramekins/bowls and push to the sides and place back in the fridge. There should be about half of the mixture left.
 
To make the raspberry sauce, heat the raspberries and water in a pan and boil. Keep stirring it, making sure the raspberries break down and the sauce thickens. If desired add a little sugar to take the edge off the sharpness of the raspberries and set aside to cool.
 
Once the sauce has cooled, split the mixture between the cheesecakes, placing a spoonful on top of each one and sprinkle on the rest of the biscuits. I thought adding some more biscuit in the middle of the cheesecake would be an interesting variation as I often find there is too much cheesecake to get through before getting to the base, but if you prefer you can put it all at the bottom of the dishes.
 
 
Put the rest of the cheesecake mixture on the top and smooth so the top of the dishes are flat and place in the fridge once again to set.
 
Chill for at least 4 hours before serving. I made them the day before serving and they were fine 24 hours later.
 
 
I thought they looked good in these glass bowls as you can see the layers and the sauce in the middle. I hope you enjoy them as much as I did!

Tuesday, 4 March 2014

Sweetcorn and Spring Onion Fritters

These are super easy to make and are great to serve as a nibble or part of a starter dish.


To make 20 - 25 fritters you will need:
 
Tempura batter (I use a box of Tempura batter mix from Sainsbury's which is 128g)
180ml of still or sparkling water (if using the batter mix)
320g of sweetcorn
About 5 spring onions, chopped into small pieces
Sunflower oil
 
In a large bowl make the batter, following the instructions on the packet if using a mix. Add the sweetcorn and spring onions and combine. If desired season the mixture (I tend to add a pinch of chili flakes and a teaspoon of sweet smoked paprika). Take a dessert spoon and take a spoonful of mixture, there should be plenty of batter on the spoon. If there isn't much batter and the mixture is saturated with the sweetcorn and spring onions then add a splash more water until there is more liquid in the mixture.
 
Heat enough sunflower oil to cover the base of a shallow frying pan until it is hot. Turn the heat down to a low heat. Spoon dollops of the batter mixture into the frying pan, making sure there is space between each fritter so they do not touch. Leave for about 3 - 4 minutes to cook until the edges of the fritters are brown and firm. Use a spatula to flip them over carefully and leave for another 3 - 4 minutes, making sure they do not burn. Once they are brown all over, remove from the frying pan and place on a plate covered in kitchen roll to soak up the excess oil. Repeat this process until all the batter mixture has been cooked, adding more oil when needed.
 
Leave to cool for a few minutes before serving. They are great served with a dip, for example, sweet chilli or tomato, and they should be crispy and very more-ish!
 

Saturday, 1 March 2014

Digbeth Dining Club - Digbeth, Birmingham

I'd heard great things about Digbeth Dining Club and knew I had to check it out.
Last night I went with three friends and had a really good time and had some really good food!
 
We arrived at about quarter to six and it was pretty quiet but people were arriving in dribs and drabs and before we knew it the place
was heaving. It was held in Spotlight, which is quite a quirky venue in Digbeth. The interior is really cool, with a few sofas, a bar and lots of interesting pictures and
 images on the walls.


After looking around the different food stalls the Original Patty Men were the top choice of food but they weren't serving until half 6 so we had a drink while we waited. Close to when they were about to start serving their burgers, a queue started to form so we joined the back and while we waited a couple of my friends decided to get some pork spring rolls from Manila Munchies (which sells Philippine food) which were very tasty (I was allowed a little taste).

 
The pastry was really crispy and there was plenty of filling which was really good and flavoursome. I regret not getting some myself!
 
The Original Patty Men seemed very popular and all night there was a long queue at their stall.


All four of us decided to have the Origin 'Ale' (some of my friends didn't understand the pun) which was a beef patty topped with smoky bacon, ale and caramelised onion marmalade, American cheese, red onion, lettuce, gherkins (which I removed, because as I have previously noted, they are the food of the devil) and mayo served in a brioche bun.


Original Patty Men describe their burgers as filthy, which they proved. The beef patty was pink and very juicy, and the burger oozed with the onion marmalade and mayo. It was absolutely incredible! I prefer all red meat served pink so I welcomed having a medium burger rather than the usual well-done patties served at most restaurants. It was so full of flavour and although I usually much prefer eating with cutlery and generally don't eat messy food with my hands, I did not care one bit that my hands were dripping with mayo, onion marmalade and juice from the meat when I was finished. Its safe to say I really enjoyed it!

We all fancied something sweet after our burgers. My friends all decided to get a gourmet toasty from Jabberwocky; two choosing the Banoffee toasty and my other friend going for the Rocky Road.


Banoffee Toasty

Rocky Road Toasty
They looked and smelt great and my friends really enjoyed them but seeing as pancake day is right around the corner I decided to get a pancake with banana and white chocolate from Platinum Pancakes.


We had a really good night. It was fun to do something a bit different and there was a wide variety of people there who all seemed to be enjoying themselves and the food! There was such a great atmosphere and I can't wait to go again!